 rigvela
Will this RAM work with my motherboard? A step-by-step check
Quick answer
Check the exact board model, DDR generation, module format and type, capacity and module count. Then look up the selected part number in the tested-memory list and read any CPU or BIOS conditions. Matching DDR is only the first step; fitting the slot does not establish stable operation.
Check DDR4/DDR5 capacity and slot totals →Keep the motherboard support page and the RAM specification open while checking DDR, capacity, the exact kit and recommended slots. For a laptop or prebuilt PC, also use the system manufacturer’s documentation.
Checklist as text
You can select and copy this text manually. The list does not mark any checks as completed.
On this page
Identify the exact board and processor
Record the complete motherboard name and any hardware revision. Use purchase records, the board label or system information. For a prebuilt computer, record the whole PC model too; a board resembling a retail product can have system-specific restrictions.
On the official page, open Specifications and the manual. Look under Support, Compatibility or CPU/Memory Support for tested memory. Menu names vary, so follow their purpose. Record the exact CPU and the installed BIOS version when the PC is working.
Match DDR, form factor and module type
Find DDR3, DDR4 or DDR5 in the Memory specification and compare it with the RAM. Generations are not interchangeable in a conventional slot. For example, ASUS TUF GAMING B760-PLUS WIFI D4 uses DDR4, while TUF GAMING B760-PLUS WIFI uses DDR5. Sharing LGA1700 does not give these boards the same memory support.
Next check DIMM or SO-DIMM. Conventional desktop boards usually use DIMMs; smaller SO-DIMMs appear in laptops and some mini PCs. UDIMM and RDIMM are different types too: a registered server module does not meet an unbuffered-memory requirement just because DDR matches.
Check ECC support separately for the board and CPU. DDR5 on-die ECC does not by itself identify a server ECC module or establish system-level ECC support. With DDR3, also verify DDR3 versus DDR3L and the exact module’s voltage requirements.
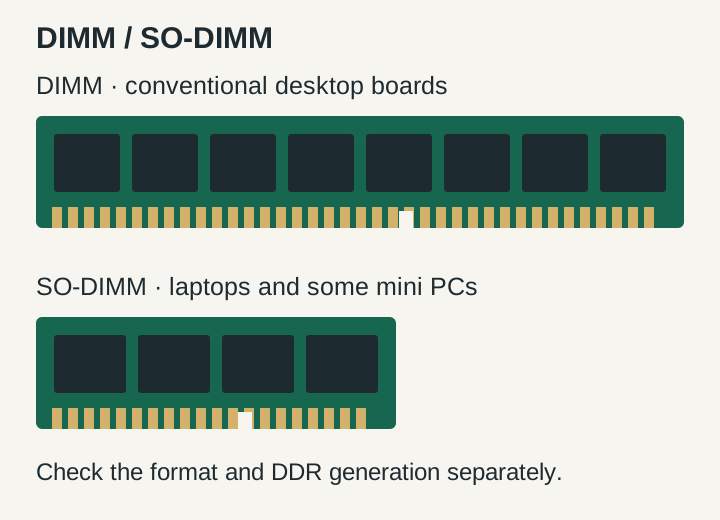
Count modules and capacity
A 32 GB (2×16 GB) kit contains two 16 GB sticks and needs two slots. A 1×32 GB product is one 32 GB module, whose support must be checked separately. The board’s total capacity limit does not establish support for every capacity in one slot.
When adding RAM, count everything you will keep. For example, a two-slot board already holding 2×8 GB has nowhere to put two more sticks; increasing capacity needs replacement or another documented plan. Free sockets on a four-slot board settle space, not whether separate kits work together.
Check the total limit, supported module capacities and any CPU or BIOS conditions. A newer capacity may need a particular firmware version. Ask the manufacturer about an undocumented configuration before buying.
Find the part number in the QVL and read the whole entry
The QVL lists memory the manufacturer has tested with the board. Select your exact board and the CPU group when offered. Search the complete part number using the page search or Ctrl+F. A family name such as Vengeance or Fury is insufficient.
Match the configuration as well as the name. Some lists identify a kit, others an individual module; establish how the entry relates to the product you are ordering. Read the table legend, CPU/BIOS notes and tested module count. A result for two sticks should not automatically be extended to four.
An absent entry does not prove incompatibility. Check the memory vendor’s system selector or ask support with the exact models. Keep an undocumented combination unconfirmed rather than choosing a similar kit at random.
| Field | What to match |
|---|---|
| Part number / Model | The complete part number, any listed revision and how kit and module numbers relate. |
| Size / Capacity | Does this mean one module or the whole kit? Check the list’s definition. |
| DIMM / Socket support | Which installed module count is covered? Read the legend, not just a check mark. |
| Speed / Profile / Notes | The tested rate, profile mode and platform conditions where these are published. |
Separate basic operation from the advertised speed
The 6000 on a box may describe an overclocking profile. XMP and EXPO provide modes beyond standard settings; having a profile does not guarantee the result with every CPU, board and module count. A board specification marked OC also needs its conditions checked.
Establish the module’s standard modes and the profile you want. A lower supported rate may be possible, but the maximum number on the box alone cannot promise it. Four modules can have different speed limits from two. Follow documented standard settings for the first start; profile changes need separate verification.
Choose the slots and check cooler clearance
Open Memory installation or Recommended memory configuration in the manual. For MSI B650 GAMING PLUS WIFI, the manufacturer shows one module in DIMMA2 and a pair in DIMMA2 plus DIMMB2. The diagram below illustrates that specific example. Use your own board’s labels and layout; slot colour is not a substitute for its manual.
Four sockets do not mean four memory channels. On a conventional dual-channel platform, installing four modules does not create quad-channel operation. Follow that platform’s population rules.
Compare RAM height with clearance under the CPU cooler’s heatsink and fan. Raising a fan can increase total cooler height, so check the case as well. Shut down the PC and disconnect the mains power cable before installation. Align the module and socket keys and follow the manual’s latching procedure.
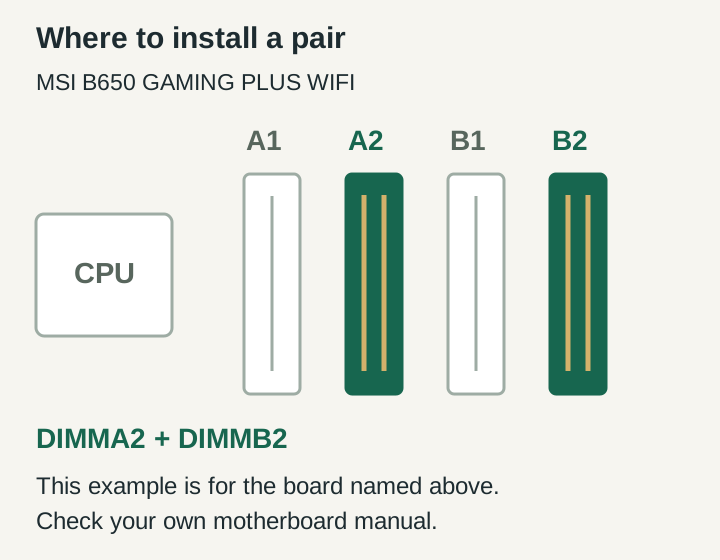
Decide whether to add RAM or replace the kit
If you keep the old modules, check the whole combination: part numbers, revisions, capacities and module count. Matching DDR, speed and brand do not guarantee operation together. CORSAIR recommends the modules from one kit, validated as a set.
Before paying, save the board and CPU models, RAM part number, module count, total capacity, QVL link or support confirmation, intended slots and profile conditions. Change a choice with a direct contradiction, such as the wrong DDR, format or an exceeded limit. Leave missing information unresolved and ask for clarification.
RigVela’s DDR4/DDR5 assistant compares entered DDR type, module count and capacity against limits. It does not check the QVL, revisions, voltage, cooler clearance or XMP/EXPO stability. DDR through DDR3 and laptop-specific restrictions need system documentation. If the PC fails to start after installation, follow the separate troubleshooting guide rather than guessing voltage changes.
Quick checklist
- Record complete board, CPU and kit identifiers.
- Match DDR generation, form factor and memory type.
- Check per-module capacity, total capacity and slot count.
- Read QVL and CPU/BIOS conditions; record what remains unknown.
- Choose documented slots and check cooler clearance.
- Decide which old modules stay and verify the combination.
Common questions
My RAM is absent from the QVL. Does that mean it will not work?
Absence alone does not prove a conflict. Check the exact part number and CPU filter, then the memory vendor’s selector or support confirmation. A similar name in the list is not your module.
Read the QVL →The board supports 128 GB. Can I install one 128 GB stick?
A total limit is not a per-module limit. Check supported capacities and configurations for the board, CPU and BIOS, including how many modules provide the total.
Count capacity and modules →Can I add RAM from another brand?
Brand alone cannot answer that. Verify the exact modules and proposed combination; even matching brand and part number do not guarantee separate kits are stable together. Consider a kit validated as a set for the capacity you need.
Adding or replacing RAM →Do four slots mean quad channel?
No. Socket count and channel count are different specifications. Four modules on a dual-channel platform do not create quad-channel operation.
Check sockets and channels →Work out your DDR4 or DDR5 upgrade
Compare DDR type, total capacity and module count with board limits. Follow this guide to verify the QVL, voltage, revisions, cooler clearance and profile stability; the calculator does not confirm those checks.
Documentation & sources
These are the documents used in this guide. Check your exact model’s specifications on its support page.
- ASUS TUF GAMING B760-PLUS WIFI D4 specifications ↗
- ASUS TUF GAMING B760-PLUS WIFI specifications ↗
- Intel: choosing memory and module formats ↗
- Kingston: unbuffered, registered and ECC memory ↗
- Kingston: DDR5 on-die ECC and module keying ↗
- MSI B650 GAMING PLUS WIFI memory specifications ↗
- ASUS: how to find and search the memory QVL ↗
- MSI B650 GAMING PLUS WIFI manual: printed pages 8 and 28 ↗
- ASUS: memory installation and slot selection ↗
- Kingston: memory population and channel rules ↗
- Intel: XMP memory overclocking profiles ↗
- AMD: EXPO memory profiles ↗
- CORSAIR: combining separate memory kits ↗
- Noctua: RAM clearance under CPU coolers ↗